How to Create Backups on a Business Hosting Package
How to Create Backups on a Business Hosting Package
This article provides step-by-step instructions on how to create backups on your business hosting package in cPanel. If at any point you need assistance with this process, please feel free to contact us via a ticket or Live Support and we would be happy to further assist.
To create backups of your cPanel account, please use the following steps (NOTE: The graphics shown in this article were taken on a cPanel account using the Paper Lantern theme. If you are using Paper Lantern's Retro theme, your cPanel will look different, but the steps will be the same):


(Note: ensure the "Email Address" field is filled out with your email address to ensure you receive an email when the backup completes)
Congratulations! You've successfully created a full backup of your cPanel account that can be provided to us anytime in the event that you need your account restored. Please note that the above method leaves a copy of the backup in your /home/USER directory, and you will want to remove that copy AFTER downloading it, as storing backups on business hosting accounts is considered data warehousing, which is against our Acceptable Use Policy.
Removing newly-created backups from the server:
To remove these newly-created backups from the server, please refer to the following steps:


You have now successfully created, downloaded, and removed a full backup of your cPanel account. We recommend taking backups in this way on a regular basis to ensure you always have a safe copy of your data to restore from in the event of an emergency.
For more information on cPanel's "Backup" module, you may be interested in reading their Official Documentation. We also recommend consulting our Backups Primer for more information on why taking backups are crucial for success, as well as suggested best practices.
As always, if you have any questions regarding anything in this article, or backups in general, please do not hesitate to Contact Us at anytime, 24/7/365, and we will be happy to assist you with any questions you may have.
Thank you!
This article provides step-by-step instructions on how to create backups on your business hosting package in cPanel. If at any point you need assistance with this process, please feel free to contact us via a ticket or Live Support and we would be happy to further assist.
To create backups of your cPanel account, please use the following steps (NOTE: The graphics shown in this article were taken on a cPanel account using the Paper Lantern theme. If you are using Paper Lantern's Retro theme, your cPanel will look different, but the steps will be the same):
1. Log into cPanel and select "Backup":
2. Select "Download a Full Website Backup":
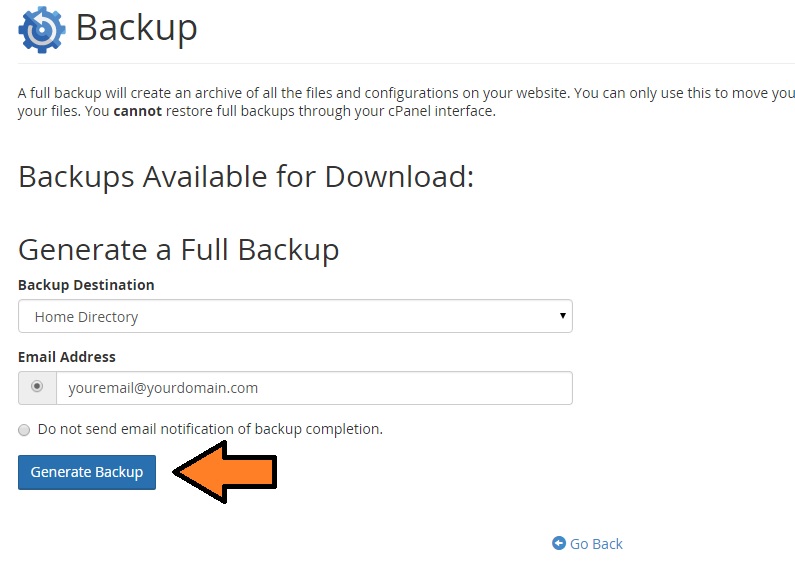
3. Select "Generate Backup":
(Note: ensure the "Email Address" field is filled out with your email address to ensure you receive an email when the backup completes)
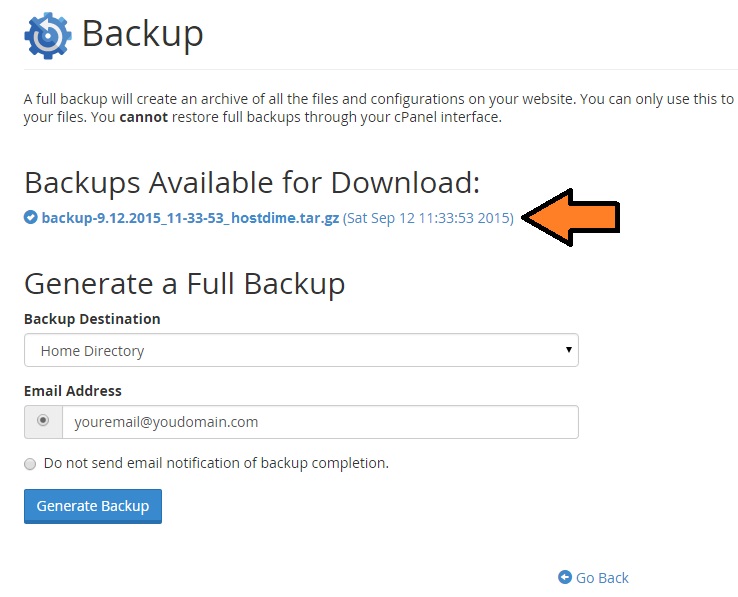
4. Select the newly-generated backup under "Backups Available for Download" to download it to your computer:
Congratulations! You've successfully created a full backup of your cPanel account that can be provided to us anytime in the event that you need your account restored. Please note that the above method leaves a copy of the backup in your /home/USER directory, and you will want to remove that copy AFTER downloading it, as storing backups on business hosting accounts is considered data warehousing, which is against our Acceptable Use Policy.
Removing newly-created backups from the server:
To remove these newly-created backups from the server, please refer to the following steps:
1. Select "File Manager" from the top bar:
2. Select the "/home/USERNAME" (replace username with your cPanel username) directory from the left-hand side of the file manager interface:
3. Right-click the backup you created (it will be named "backup-MM.DD.YYY_HH-MM-SS_USERNAM.tar.gz, where "MM.DD.YYY" is the date and "HH-MM-SS" is the time the backup was created) and select "Delete" from the menu that pops up:
4. Make sure "Skip the trash and permanently delete the files" is checked, then select "Trash File(s)" from the menu that pops up.
You have now successfully created, downloaded, and removed a full backup of your cPanel account. We recommend taking backups in this way on a regular basis to ensure you always have a safe copy of your data to restore from in the event of an emergency.
For more information on cPanel's "Backup" module, you may be interested in reading their Official Documentation. We also recommend consulting our Backups Primer for more information on why taking backups are crucial for success, as well as suggested best practices.
As always, if you have any questions regarding anything in this article, or backups in general, please do not hesitate to Contact Us at anytime, 24/7/365, and we will be happy to assist you with any questions you may have.
Thank you!