Enable Autoscaling for a Virtual Server
Autoscaling will allow our system to automatically adjust resources allocated to your Cloud server. However, this is not enabled by default.
The autoscaling feature is billed on an hourly basis as an add-on. Please contact our Sales team to learn more.
If you enable autoscaling, predicting your final bill at the end of the billing period may become difficult, since the amount of resources you use will vary over time. Our system only bills you for the resources you make available to your virtual server.
Autoscaling does not guarantee that your virtual server won't run out of available resources, but it does make it far less likely to happen.
To use the autoscaling feature, first navigate to the virtual server's main page:
Access the Virtual Server's Page
This is how you access your Cloud server's main page in HostDime's Cloud.
- Log into your CORE account and click Cloud under the Products menu.
- Click the Login to Cloud Portal button.
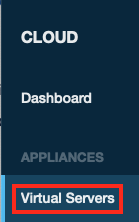
- Now you will be on our Cloud dashboard page. Click on the Virtual Servers item in the sidebar to switch to a view of your virtual servers.
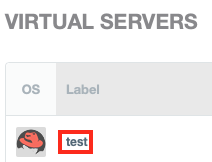
- You will see a list of all of the virtual servers you've created. Click on the Label for the server you want to work with.
- This will take you to a page where you can see up-to-the-minute statistics and work with your virtual server.
Enable Autoscaling
To enable the autoscaling feature on this virtual server, follow these steps:
First, you need to toggle the switch to turn on autoscaling if it isn't already enabled. This will attempt to install and run a small program on your virtual server that will watch your virtual server for the conditions you will set later.
You can also accomplish this step when you deploy your virtual server by enabling the toggle next to Autoscaling on the final screen before the virtual server is actually created.
- Once enabled, you will need to set the conditions that you want to have autoscaling triggered (either up or down). To start the setup, select Autoscaling from the Overview menu drop-down.
- All of the autoscaling options will be displayed, but they will be disabled by default. The first section is Up. The items you enable in this section will allow our system to add additional resources to your virtual server.
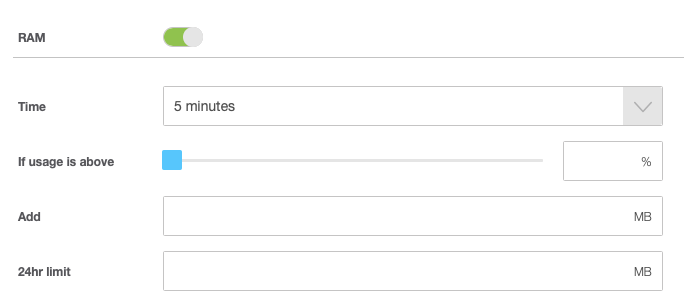
- To automatically add RAM to your virtual server as needed, enable the toggle next to RAM in this section and adjust the settings.
- The Time controls how often the serving on your virtual server checks how much RAM you are using. The maximum is every 5 minutes, but you can select less frequent checks if you prefer.
- If usage is above allows you to set a percentage (in 10% increments) above which our system will add more RAM. Generally, you'll want this set to something less than 100%, especially since checks aren't constant.
- If the threshold above is met during the check, Add will increase the amount of available RAM in your virtual server by this amount you specify here. So if you enter 1024 here, our system will add an additional 1024MB of RAM to the virtual server if current memory use is more than the percentage set in step c.
The 24hr limit is the maximum amount of RAM our system will add to your virtual server in a 24 hour period.
For example, if you set the time to 5 minutes, the usage percentage to 80% and tell the system to add 1024 MB of RAM up to 4096 MB in 24 hours, then our system will check your virtual server every 5 minutes and if the amount of RAM used is above 80%, we'll add 1 GB of RAM. We will continue to add RAM in 1 GB increments every time your virtual server is over 80% RAM usage until we have added a total of 4 GB of RAM to your virtual server in a 24-hour period, then our system will stop adding more RAM until the next 24-hour period starts.
- To automatically add RAM to your virtual server as needed, enable the toggle next to RAM in this section and adjust the settings.
The next section deals with increasing CPU Usage.
Please note that the CPU Autoscaling feature is not currently supported. We plan to release this in a future update.
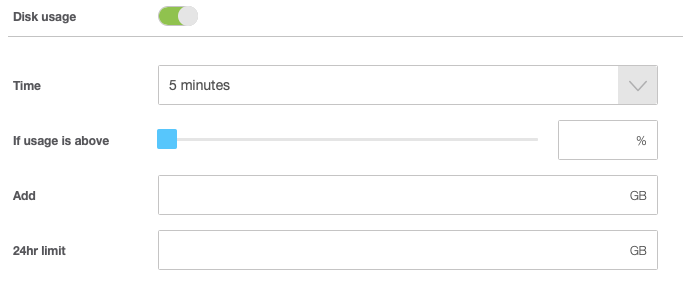
- The final section in Up is Disk usage.
- This section will feel familiar if you've adjusted the other sections already. Time controls how often checks are done.
- If usage is above controls the percentage above which action is taken to increase disk space.
- You can specify the amount of extra disk space our system will Add in GB.
Finally, you can set the maximum amount of additional disk space our system will add by adjusting the 24hr limit.
Although our system can add additional disk space to your virtual server automatically, we cannot REDUCE the amount of disk space assigned to a primary disk. This is because most file systems do not support handling an underlying reduction in the size of the disk (but they can handle increases).
The next autoscaling section is Down. The items you enable in this section will allow our system to remove resources from your virtual server. You can adjust RAM and CPU usage only, not disk space. If utilization drops below the percentage you set, our system will reduce the amount of available RAM or the CPU priority.
- When done, click Apply. So long as the autoscaling service is active on your virtual server, our system will automatically add or remove resources as you've directed.
If you disable or block network access to the autoscaling service on your virtual server, autoscaling will not work, regardless of the settings above.


