Making and Restoring Backups in NodeWorx
If you want to create, restore or delete backups of SiteWorx accounts from within NodeWorx, you can manage the entire process via the user interface. You don't need to do anything via the command line on your server (unless you want to).
Making SiteWorx Account Backups from NodeWorx
Creating backups of critical SiteWorx account information from NodeWorx can be accomplished by following these steps:
- Log into NodeWorx as an administrator or reseller if you haven't already.
- Select Backup/Restore from the SiteWorx section of the sidebar.
- You will see a list of the SiteWorx accounts on your server. If you want to make a backup, select the checkbox to the left of each account you want to back up. If you want back up all of the accounts, click on the checkbox to the right of the With Selected: line below the list of accounts. This will automatically check all accounts.
- Once you have the accounts you want to backup selected, choose the type of backup you want to make from the drop-down list on the With Selected: line and click Go.
- A Full Backup will back up everything about the selected SiteWorx account including web content, email, subdomains, etc. Usually, this will be the sort of backup you'll want to make.
- A Structure-Only Backup will back up only the metadata associated with an account, but it won’t backup the user content or email. This sort of backup would allow you to recreate the account, associated domains, email accounts and other data without restoring any web content, databases or email messages. This sort of backup takes up a lot less space and might be handy if the SiteWorx account has been compromised and you want to restore the account without any compromised user data. It would then be up to the SiteWorx user to import or replace their website content, databases and email if they need it.
- The system will create the selected type of backup for the accounts you've specified in the background. Any successful backups will be listed here once they are done.
Restoring a SiteWorx Account from a Backup in NodeWorx
If you have some backups of SiteWorx accounts, you can restore them directly from the user interface in NodeWorx. Follow these steps to restore those accounts:
- Log into NodeWorx as an administrator or reseller if you haven't already.
- Select Backup/Restore from the SiteWorx section of the sidebar.
- Find the SiteWorx account you want to restore from the list and click MANAGE in the Status column. If you don't see this, then that account may not currently have any available backups to restore from.
- You will now be shown a list of all of the backups on this server for that SiteWorx account. Find the backup that you want to restore from (be sure to note the type of backup it is and what date it was made on. Click RESTORE to start the restoration process.
- You will be asked to confirm that you want to restore the account and then the system will work in the background to restore the account.
Restoring a backup will completely replace the content currently found in the selected account with whatever content is in the backup. This cannot be undone unless you make a backup of the account just before restoring a different backup.
Delete One or More SiteWorx Backups from NodeWorx
You may need to occasionally delete older backups to free up space on your server. Follow these steps to do that from within NodeWorx:
- Log into NodeWorx as an administrator or reseller if you haven't already.
- Select Backup/Restore from the SiteWorx section of the sidebar.
- Click MANAGE in the Status column of the SiteWorx account that contains backups you want to remove.
- If you want to delete only certain backups, select the checkbox to the left of each backup you want to remove.
- If you prefer to only delete a single backup, click the trash can icon in the Actions section of the backup you want to remove.
- If you want to select all backups, check the box to the left of With Selected: and all displayed backups will automatically be selected.
- Once you've selected the account backups you want to remove, click the Go button on the With Selected: line.
- You will be asked to confirm if you really want to delete the backups you've selected. If you click Delete the backups will be removed in the background without any further prompts.
You cannot restore a backup you've deleted unless you made a copy of the backup in some other location.
Scheduling Automated Backups in NodeWorx (InterWorx 7.3.0 or Later Required)
In InterWorx 7, you can set up regular SiteWorx account backups from within NodeWorx so you don't have to manually make backups. In order to do this:
- Log into NodeWorx as an administrator.
- Under the NodeWorx section, select Plugins so you can enable the backup cron.
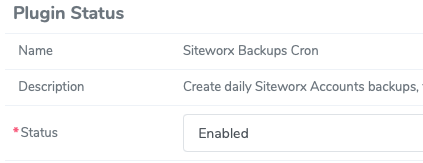
- Look for the SiteWorx Backups Cron item listed in the Backups section. Click the pencil icon to edit and enable this feature.
- Set the Status to Enabled if it isn't already. If you set it to Disabled, the cron will be removed (or not created) and automatic backups will not be made.
- In the Configuration section, you control how often and where backups are made.
- The Backups Path is the path to a local server mount point or directory where you want these automated backups placed. By default it suggests /backup.
- Keep Daily Backups specifies the number of once daily backups to keep. The default is 4. That will keep 4 days of backups before deleting the oldest daily backup to make a new one.
- Keep Weekly Backups specifies the number of once per week backups to keep. The default is 3. The day the weekly backups run, the weekly backup will match that day's daily backup (if one was made). The oldest weekly backup will be deleted to make room for a new one if the specified number of backups is reached.
- Keep Monthly Backups specifies the number of once a month backups to keep. The default is 2. The day the monthly backups run, the monthly will match the daily or weekly backups if any of those were made on the same day). The oldest monthly backup will be deleted to make room for a new one if the specified number of backups is reached.
- Minimum Disk Space will specify how much free disk space (in percent) must be free (unused) in order to make new backups. The default is 5 percent. If you leave it at 5, no backups will be made at all if the total free disk space in the Backups Path is less than 5% of the total disk space for the volume on which backups are stored. Be sure not to let your backup location get too full.
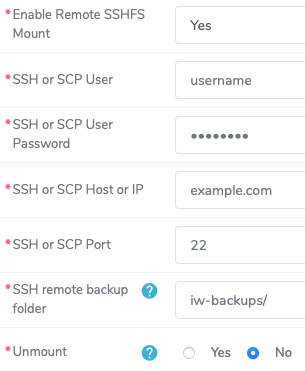
If you want to store these automated backups in a remote location, you can Enable Remote SSHFS Mount. Setting this to Yes will reveal a number of additional items needed for this type of backup.
SSHFS is a method of using an SSH connection to mount a remote file system as if it were local. Because SSH/SCP is used, backups made this way are secure while the data is flowing to the remote server.
- SSH or SCP User should be the username of the remote SSH/SCP user in whose home directory these remote backups will be stored.
- The SSH or SCP Host or IP should be the host name or IP address of the remote system that is going to be accessed.
- The SSH or SCP Port should be the port number used to access SSH on the remote server. The default is 22, but check with your remote server provider to find out what the correct port is if 22 doesn't work.
- Specifying the SSH remote backup folder will put the compressed backups into that location (relative to your home directory - the place you start in when you log in via SSH). They recommend that you use the absolute path to the location. For example: /home/myuser/iw-backups/. The directory/folder name should end with a /. If you enter just a / then the backups will be placed in your remote home directory.
- If you set Unmount to Yes, your server will disconnect from the remote server once backups are completed. This is a good thing from a security standpoint, but if you are going to work on the remote volume after the backups are complete, you can leave it mounted. Just don't forget to unmount once you are done.
- Click Save to apply these settings and set up the automatic backup process.


