
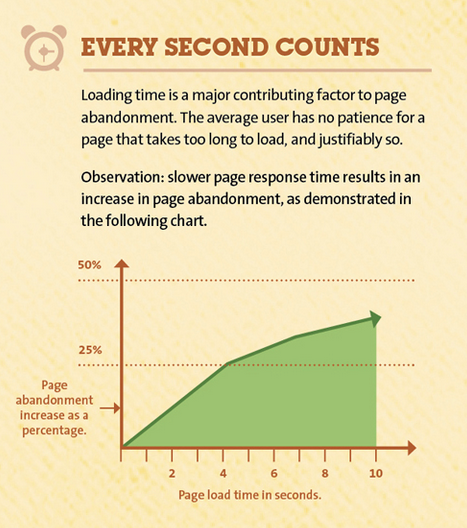
Slow loading sites are frustrating users and negatively impacting enterprises like never before. 53% of site visits are abandoned if the page takes longer than 3 seconds to load. Time is literally money when it comes to your site speed.
One potential way to make your website faster involves your server’s physical location near your target market.
Usually the closer the website visitor is to the web server, the fewer networks the data passes through. Say you are targeting United States customers and you have a United Kingdom server and IP address. The data has to travel across the Atlantic Ocean, so latency and download speed will be a bit slower than if you were around the same area as your intended market.
When thinking of server location in terms of speed and proximity, it’s not always about distance, but also hops. Hops in this case refers to the number of routers and exchanges taking place between the user and the hosting provider. Often, the further the distance, the more hops and added latency for faraway users.
In a recent Google study, they report that “artificial latency added to the newspaper The Telegraph resulted in page views dropping by 11% for a 4 second delay and 44% for a 20 second delay.” On the flip side, “Ancestory.com recorded a 7% positive rise in conversions after improving the render time of web pages by 68%, reducing page bloat by 46% and reducing load time by 64%.”
To deliver the speediest result for your visitors, find a host that doesn’t overcrowd their servers. The more sites on a server means more resources those sites use up, which equals a slower page load for your website. Also make sure you are reducing page load time on your end. Tips include image optimization, reducing HTTP requests, PHP and database queries, and removing useless plugins.
Does Server Location Matter for SEO?
Here’s Google’s most recent position as of 2021:
Server location (through the IP address of the server) is frequently near your users. However, some websites use distributed content delivery networks (CDNs) or are hosted in a country with better server infrastructure, so we try not to rely on the server location alone.
Translation: while you should choose the IP of your targeted country to your site, this doesn’t hold the same weight as it used to, as Google is adjusting to a more interconnected global market.
“Is speed definitely a ranking factor? YES.” – John Mueller, Google’s Senior Webmaster Trends Analyst
In the end, speed is the goal and having a slow site can even be a negative ranking factor.
HostDime’s Free CDN Speeds Up Your Server
A Content Delivery Network is a network of servers located worldwide that store cached content. CDNs attempt to load your website as fast as if it was right in your user’s location.
HostDime leverages 20 data center locations around the global to provide an instant free CDN for web content hosted in our cloud infrastructure. Benefits include:
- REDUCED LATENCY: As we have stated, the closer you are to your end user, the quicker your page will load, creating a great website experience and improved search rankings and sales.
- HIGHER AVAILABILITY: The CDN takes load off the origin server and if one location becomes unavailable, another location serves the content.
- GREATER SCALABILITY: With your content distributed across many locations worldwide, your applications can handle higher traffic volume.
HostDime’s CDN is available to all of our Cloud clients for FREE! To activate, open up a chat and we will enable it on your cloud server.