If you are looking for how to speed up a WordPress site, you’ve come to the right place. There’s many optimization techniques worth exploring, and we’ll go over what we think are worth implementing today.
A quick note that most of the following applies only if you have control over your server, like a cloud or dedicated server. A shared hosting environment is a bit more restricted in what can be install on the server. OK, let’s dive in.
1. Analyze Your WordPress Site
57% of visitors leave if your site takes more than 3 seconds to load. Your first contact with a future customer is site arrival. Top-notch content and a beautiful page means nothing if the site doesn’t load properly or on time.
What causes a site to slow down? There’s many factors involved. My first suggestion before optimizing your WordPress server is diving into your current website build. Run a speed to test to see if anything is slowing down your site. Choose any of these recommend sites:
- GT Metrix is a page load testing tool that gives insight on how to optimize your website’s shortcomings. Enter your URL to test the load time of that page; analyze the data to find the bottlenecks.
- Pingdom will show you how long certain requests take to load in your page, presented in a waterfall chart. You will receive a grade for various performances.
2. Optimize WordPress Backend
The following section is simple steps to take before adding additional software and plugins. Skip ahead to the next section if you’ve taken stock on your current WordPress set-up.
Upgrade Your WordPress: Always make sure you have the latest and greatest version of WordPress installed for your account. Every new version of WordPress should have software installed that optimizes your site faster than before.
Update Your Plugins: You’re not done updating. It’s important to check your plugins with every new WordPress update. Separate them into two categories, ones you need and ones you don’t. Make sure the plugins you need are updated and working properly. Plugins you are not using should not just be turned off, but deleted completely. Rogue plugins can be tough on performance, so delete them from the plugins directory.
Eliminate Third-Party Plugins: One of the easiest ways to speed up the website loading is to minimize third party services/widgets from being used on your blog. Some plug-ins may be needed, but try to substitute a non-local plug-in with a WordPress plug-in whenever possible. If the 3rd party site is loading slow, your site will look goofy by default.
Optimize Your Images: Image optimization is one of the most important aspects of speeding up your WordPress site. Large image files may be slowing down your site without you even knowing it as your pictures take a heavy tool on your site’s resources. The solution: smush them!
Check out the plugin Smush Image Compression and Optimization. This super plugin should be a default install on any site that needs optimized images. Smush strips meta data and optimizes compression for your JPEGs. It eliminates extra bytes that are useless, without compromising the quality of the image. Compress any image in any directory!
Smush – Optimize Images | Compress and Lazy Load Images | Convert WebP
Place JavaScript at the Bottom: If your JavaScript is slow to load, make sure it’s at the bottom of the page so that the rest of the page will load first. You don’t want to have your JavaScript loaded first so users will see a blank page until JavaScript is fully connected.
3. Cache is King
When someone visits your website, a request is made for data off your web host’s server consisting of CSS, JavaScript, images, and so on. One way to speed up this process and enhance your server’s overall performance is to take advantage of caching.
Caching means storing pages, images, and files on the local hard drive. Therefore, the next time a request is made, the cache is served to the user instead of reloading everything again, resulting in a speedier delivery. Different times of caching exist and need to be tended to for faster results:
WordPress Cache: WordPress allows caching plugins that create a static HTML page of every single one of your webpages, reducing page load time. There are many good plugins that do this, but we’re partial to WP Super Cache.
WP Super Cache is the easiest to configure and free of charge. Some of these plugins are bloated and filled with ads; WP Super Cache is lightweight and ad-free. It works out of the box and can be tweaked by novices and experts alike. Once installed and operated, you should see an improvement immediately with the page loading tests, and the speed of both your customer facing pages and backend admin pages.
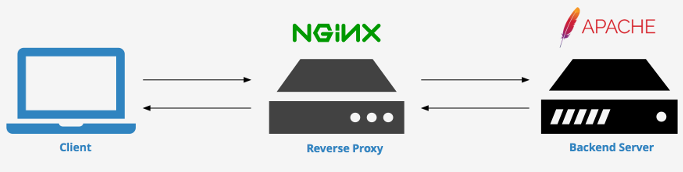
Server Cache: For high traffic sites on VPS, dedicated, or cloud servers, it would be wise to look into server caching. This is the process of using a reverse proxy server in front of the server where WordPress is actually running. The WordPress codex gives a good definition of server caching:
The simplest solutions start with the server caching locally while more complex and involved systems may use multiple caching servers (also known as reverse proxy servers) “in front” of web servers where the WordPress application is actually running.
Our server cache recommendation is Varnish Caching. I’ll let Varnish explain what they do so well:
Varnish Cache is a web application accelerator also known as a caching HTTP reverse proxy. You install it in front of any server that speaks HTTP and configure it to cache the contents. Varnish Cache is really, really fast. It typically speeds up delivery with a factor of 300 – 1000x, depending on your architecture.
Once you have Varnish Caching installed, grab the free WordPress plugin Proxy Cache Purge plugin (formerly known as Varnish HTTP Purge). This will allow you to manually clear the cache whenever you would like.
4. Optimize MySQL and Accelerate PHP
WordPress is a content management system based on PHP, which requires MySQL for data storage. WordPress repeats a lot of queries on every request, so optimizing the database will make a difference in speed.
Optimize MySQL: Perform general MySQL database optimization queries with the help of the WP-Optimize plugin. Aside from removing unnecessary data that WordPress carries like pingbacks and trackbacks, it also:
- Compact/de-fragment MySQL tables with a button-press
- Allows control of which optimizations you wish to carry out
- Carries out automatic daily, weekly, monthly clean-ups
- Retains a set number of weeks’ data during clean-ups
- Performs optimizations without the need for running manual queries
WP-Optimize – Cache, Compress images, Minify & Clean database to boost page speed & performance
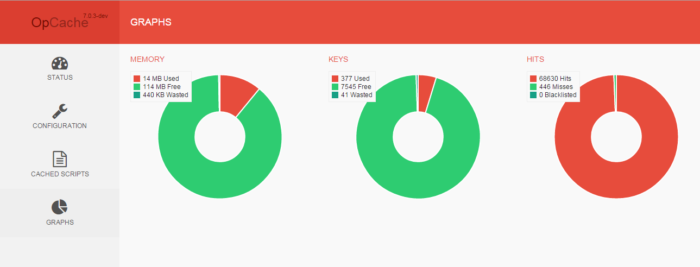
PHP Accelerator: Make sure you are using PHP 7.2 if possible and enable our recommended PHP accelerator Opcache, which performs faster PHP execution. It improves PHP performance by storing precompiled code in the shared memory. This will bypass the stage where queries have to read code from the disk.
5. Apache vs Litespeed
Once your website is optimized on the WordPress side, consider additional web server software if you are receiving heavy traffic. Here’s a quick consideration of the differences between software Apache and Litespeed.
Litespeed: Litespeed comes out of the box optimized for handling many requests. It was designed to increase performance and scalability and help with DDoS mitigation. After installation, be sure to also download the “LiteSpeed Cache” plugin inside WordPress or WHM. Once enabled, it is packed with features to help reduce server load. Here’s just a few:
- Object Cache (Memcached/LSMCD/Redis)
- Image Optimization (Lossless/Lossy)
- Minify CSS, JavaScript, and HTML
- Lazyload images/iframes
- Smart preload crawler with support for SEO-friendly sitemap
- Database Cleaner and Optimizer
- OPcode Cache
Apache: Apache is the world’s most widely used server software. Free and open source, it continually grows bigger while staying flexible and versatile. If you use Apache, it would be prudent to consider implementing load balancer NGINX as a reverse proxy for increased performance. As we mentioned earlier, this will help with server caching. Let NGINX handle the static assets as its faster than Apache, and let Apache handle everything else.
Again, this is all based on what works best for your specific server set-up and how much traffic you receive. Also something to consider: Litespeed is easier to set-up than Apache and is less resource intensive. Whichever you choose, our suggestion is to either use LiteSpeed with OPcode Caching and enable the LS Cache module, or use Apache with NGINX and Varnish installed.
HostDime Cloud Loves WordPress
The HostDime Cloud and WordPress are a match made in heaven for any website that needs scalability, availability, and speed.
Leverage our cutting-edge hardware of Enterprise-grade processors and industry best SSDs to create your instant infrastructure in mere seconds!
Best of all, each cloud server comes with a free Content Delivery Network! HostDime leverages 20 data center locations around the global to provide an instant CDN for web content hosted in our cloud infrastructure, speeding up your entire cloud server due to reduced latency.
Cloud servers start at just $34 a month! For a limited time only, HostDime will match your initial credit deposit! For example, if you put in $1,000, you will receive $2,000 total! There is no maximum to the amount we’ll match!

To take advantage of the deposit match, please open a ticket in CORE and we will add your funds; you have 30 days from purchase date to request a credit match from our sales team.
For any questions you may have, please don’t hesitate to open a chat.
[divider]
Jared Smith is HostDime’s SEO & Content Strategist.